Table of Contents
Table of Contents
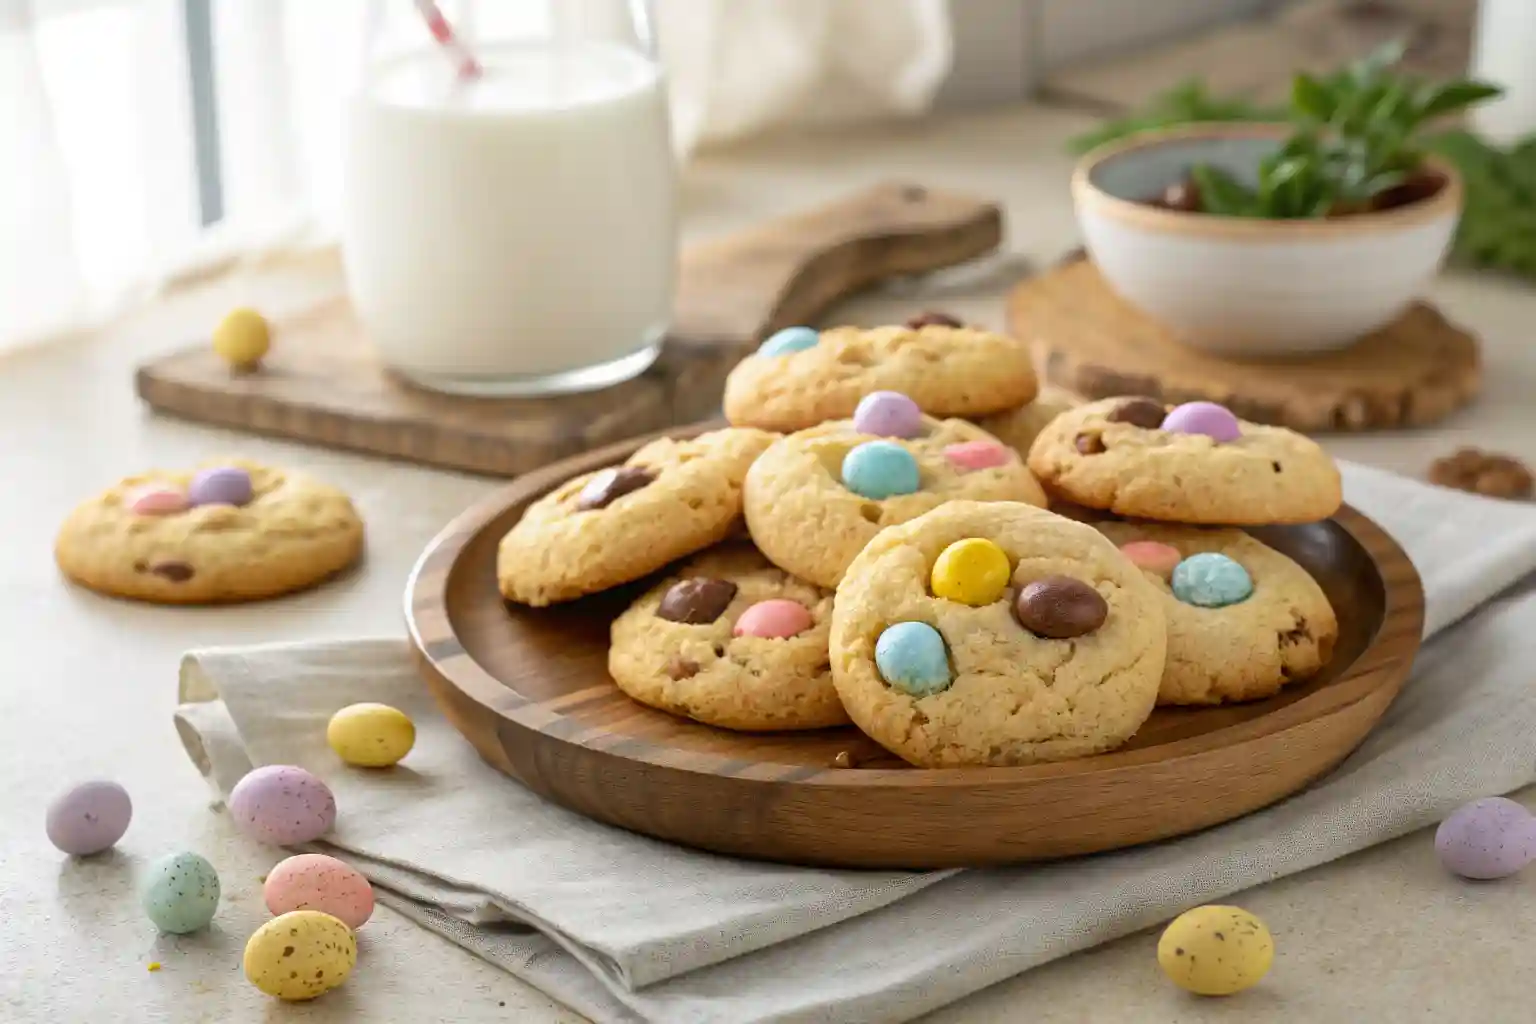
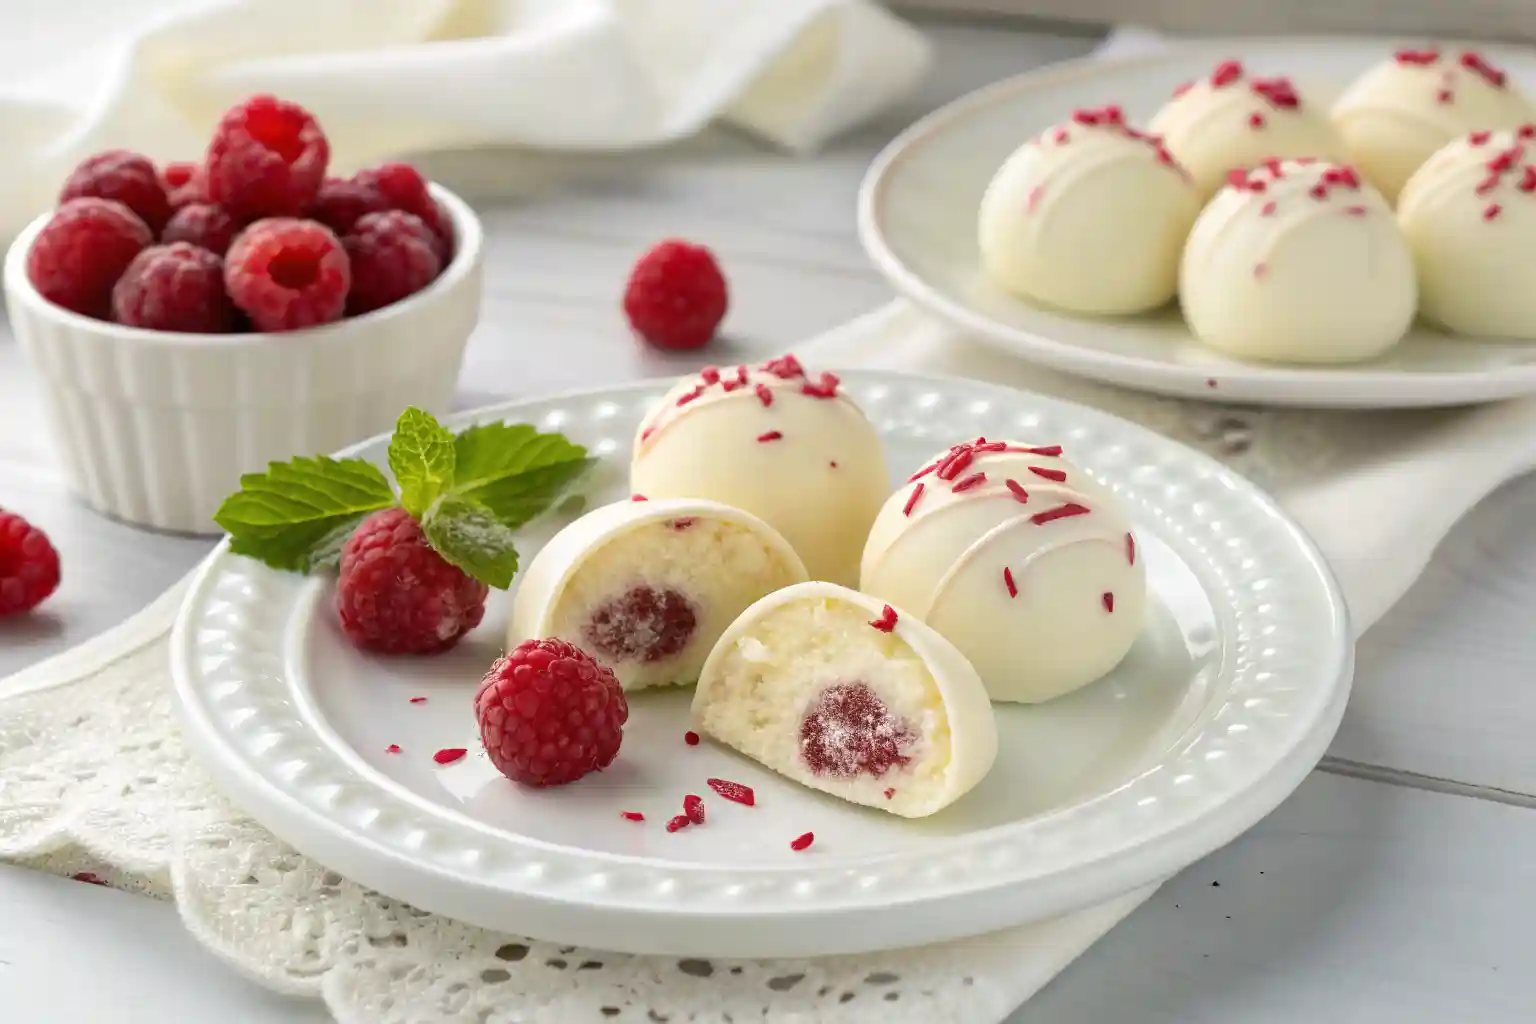
Imagine biting into a creamy, melt-in-your-mouth treat that perfectly balances the sweetness of white chocolate with the tart burst of raspberries. Sounds irresistible, right? These white chocolate raspberry cheesecake balls are everything you love about cheesecake rich, smooth, and indulgent wrapped into a bite-sized delight.
The best part? You don’t need an oven. This easy, no-bake dessert comes together with just a handful of ingredients, making it perfect for last-minute treats, holiday gifting, or simply satisfying your sweet cravings. Whether you’re making them for a party, a special occasion, or just because, these truffle-like cheesecake bites are sure to impress.
Ready to whip up a batch? Let’s get started.
Why You’ll Love This Recipe
If you love easy, no-bake desserts, these white chocolate raspberry cheesecake balls are about to become your new favorite treat. They’re creamy, rich, and bursting with raspberry flavor, all wrapped in a luscious white chocolate shell. Whether you’re making them for a special occasion, a holiday gift, or just because, these bite-sized delights are as fun to make as they are to eat.
Here’s why you’ll love them:
- No-Bake & Hassle-Free: No need to turn on the oven. These cheesecake balls come together quickly with minimal effort.
- Perfectly Balanced Flavor: The sweetness of white chocolate pairs beautifully with the tangy raspberry cheesecake filling, creating an irresistible combination.
- Great for Any Occasion: Serve them at parties, gift them to friends, or keep a batch in the fridge for an anytime treat.
- Customizable & Fun to Make: Switch up the coating, add a drizzle of dark chocolate, or roll them in crushed graham crackers for extra texture.
With just a handful of ingredients and a few simple steps, you’ll have a batch of decadent cheesecake bites ready to impress. Ready to get started? Let’s dive in.
Ingredients
Before you start rolling these white chocolate raspberry cheesecake balls, gather your ingredients. Each one plays a key role in creating that creamy, melt-in-your-mouth texture with just the right balance of sweetness and tartness.
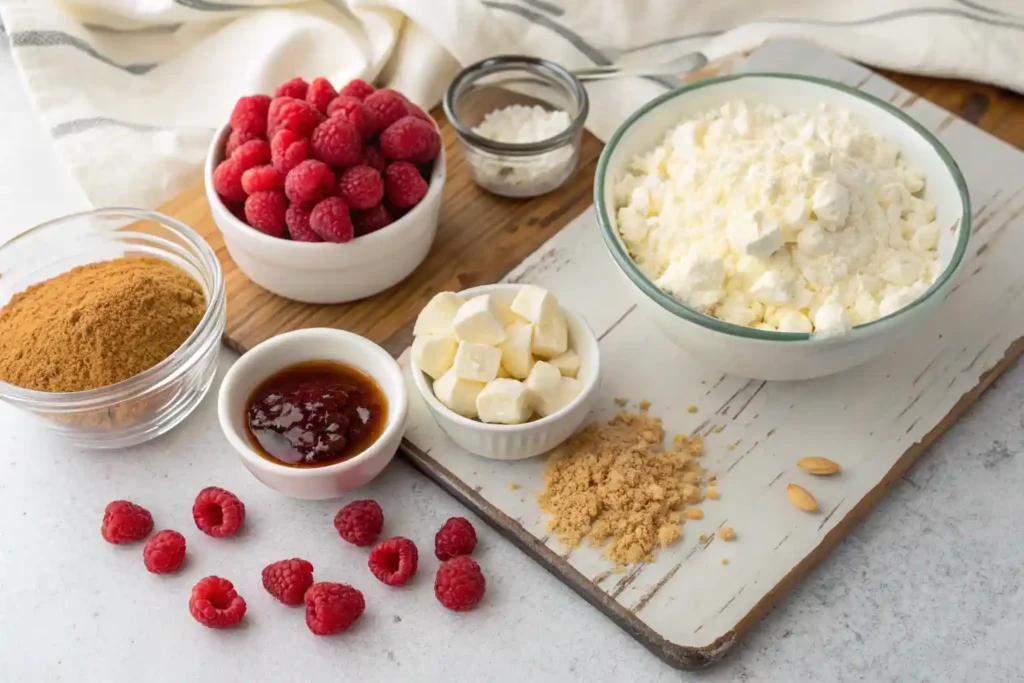
For the Cheesecake Filling:
- 8 oz cream cheese (softened): The base of the filling, giving it a rich and velvety texture.
- 1/4 cup powdered sugar: Sweetens the mixture without making it grainy.
- 1 tsp vanilla extract: Enhances the flavor with a warm, sweet aroma.
- 1/2 cup fresh raspberries (mashed): Adds a natural tartness and a pop of fruity goodness.
- 1/2 cup graham cracker crumbs: Helps bind the filling while adding a classic cheesecake flavor.
For the Coating:
- 12 oz white chocolate (melted): Creates a smooth, creamy shell that pairs beautifully with the tangy filling.
- 1 tbsp coconut oil (optional): Helps thin the chocolate for easier dipping.
- 1/4 cup freeze-dried raspberry crumbs (optional): Adds color and an extra burst of raspberry flavor.
Want to mix things up? You can swap fresh raspberries for freeze-dried raspberry powder for a more intense berry flavor. Or, if you love contrast, try dipping some in dark chocolate instead of white.
Now that you have everything ready, let’s dive into the fun part making these delicious cheesecake bites.
Directions
Now that you’ve got all your ingredients ready, it’s time to bring these white chocolate raspberry cheesecake balls to life. The process is super simple, and the results are absolutely worth it. Let’s break it down step by step:
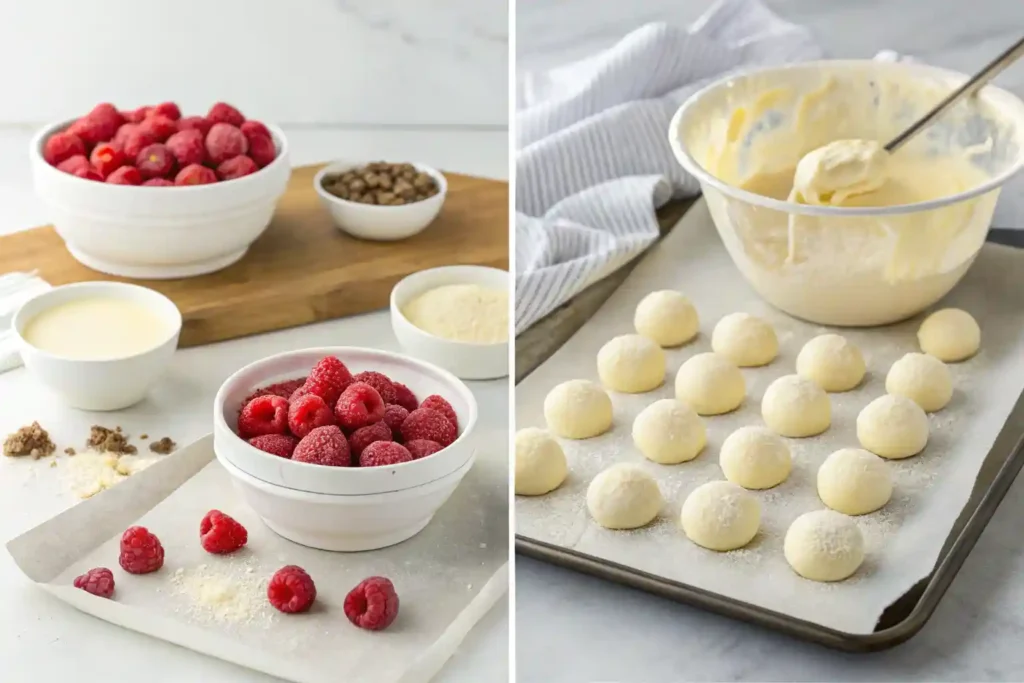
- Prepare the cheesecake filling:
In a mixing bowl, combine the softened cream cheese and powdered sugar. Use an electric mixer to beat them together until the mixture is smooth and creamy. Add in the vanilla extract and mashed raspberries, then continue mixing until everything is well incorporated. Finally, stir in the graham cracker crumbs to give the filling structure. - Shape the cheesecake balls:
Using your hands or a cookie scoop, take small portions of the filling and roll them into balls. Aim for about 1-inch size balls. Place them on a parchment-lined tray or plate. Once all the cheesecake balls are shaped, pop them into the freezer for about 30 minutes. Chilling them helps them hold their shape and makes dipping easier. - Prepare the white chocolate coating:
While the cheesecake balls are chilling, melt your white chocolate. You can do this in a microwave-safe bowl, heating in 20-30 second intervals and stirring in between to avoid burning. If you want a smoother coating, add a tablespoon of coconut oil to the chocolate and stir until fully melted and glossy. - Dip the cheesecake balls:
Once the cheesecake balls are firm and the chocolate is ready, it’s time to dip. Using a fork or toothpick, gently dip each cheesecake ball into the melted white chocolate, ensuring it’s fully coated. Let any excess chocolate drip off before placing them back on the parchment-lined tray. - Chill the coated balls:
After all the cheesecake balls are dipped, return them to the freezer for about 15 minutes or until the white chocolate has set. - Optional garnish:
For an extra burst of flavor and a pretty finish, sprinkle freeze-dried raspberry crumbs on top of the chocolate-coated balls before the chocolate hardens. This adds a pop of color and an extra raspberry zing.
Once the chocolate is set, your no-bake cheesecake bites are ready to serve. Enjoy them right away or store them in an airtight container in the fridge for up to a week.
It’s that simple. These cheesecake balls are sure to be a hit at any gathering or make a perfect treat for yourself. Enjoy the creamy, fruity, and sweet goodness with every bite.
Expert Tips and Variations
Ready to make your white chocolate raspberry cheesecake balls even better? Here are some expert tips and fun variations to take your treat to the next level:
Tips for Perfect Cheesecake Balls:
- Softened cream cheese is key: Make sure your cream cheese is softened before mixing.
- Chill the balls properly: Freezing the cheesecake balls before dipping them in chocolate is essential. It helps them hold their shape and prevents the chocolate from sliding off.
- Don’t rush the chocolate: Be patient when melting the white chocolate. Heat it in small bursts and stir often to keep it smooth and glossy.
Fun Variations to Try:
- Change the coating: Love dark chocolate? Feel free to dip your cheesecake balls in dark or milk chocolate for a new twist on the flavor.
- Add a crunchy texture: Roll the cheesecake balls in crushed nuts, graham cracker crumbs, or even sprinkles for an added crunch.
- Add flavor twists: Want to get creative with the filling? Try mixing in a little lemon zest for a citrusy kick, or add a hint of almond extract for extra depth.
- Use freeze-dried fruit: For a stronger raspberry flavor, swap out fresh raspberries for freeze-dried raspberries. You can even crush them and mix them right into the filling for added berry goodness.
Troubleshooting:
- Filling too soft? If your cheesecake filling feels too soft to roll, chill it in the fridge for about 10-15 minutes before shaping.
- Chocolate too thick? If your white chocolate is too thick to coat the balls properly, just add a little more coconut oil to thin it out and make dipping easier.
These cheesecake truffles are incredibly versatile, so feel free to experiment with flavors and textures to make them your own. Enjoy the process and make it as fun and personal as possible.
Serving Suggestions
Now that you’ve made your delicious white chocolate raspberry cheesecake balls, it’s time to think about how to serve them. These cheesecake bites are as versatile as they are delicious, and with a few creative serving ideas, you can turn them into the star of any gathering or simply elevate your snack time.
Here are some fun serving suggestions:
- Party Platters: Arrange the cheesecake balls on a serving tray or platter for an elegant and easy-to-share dessert. Add a few fresh raspberries and mint leaves for a pop of color and freshness.
- Gift Packaging: These cheesecake balls make a wonderful homemade gift. Package them in a cute jar or box with a ribbon for a thoughtful and tasty present. They’ll surely be a hit at holiday parties or birthdays.
- Serve with Sauces: Drizzle a little raspberry sauce or chocolate syrup over the cheesecake balls for an extra layer of flavor. You could even serve them with a caramel sauce for a rich, sweet contrast.
- Coffee & Tea Pairings: These sweet bites pair perfectly with a cup of coffee or tea. Try serving them with a strong espresso or a smooth chai tea for a delightful treat that balances the sweetness of the cheesecake with a little kick.
- Dessert Bars: Place the cheesecake balls on a dessert bar alongside other treats, like brownies, cookies, or fruit. They’ll be the perfect bite-sized addition to any dessert spread.
Storing Leftovers
If you have any leftovers (though, let’s be honest, they might not last long), store the cheesecake balls in an airtight container in the fridge. They’ll stay fresh for up to a week, making them the perfect make-ahead dessert for busy days or last-minute parties.
Feel free to get creative with how you serve these cheesecake bites. Whether you’re enjoying them on your own or sharing them with friends, these no-bake cheesecake balls are bound to be a crowd-pleaser.
FAQs
Got questions? Don’t worry, you’re not alone. Here are some frequently asked questions to help you make the most of your white chocolate raspberry cheesecake balls and troubleshoot any potential issues.
1. Can I use frozen raspberries instead of fresh?
Absolutely. While fresh raspberries are great, frozen raspberries can be used in this recipe too. Just make sure to thaw and drain them before mashing to avoid excess moisture. Frozen raspberries will still give you that vibrant, tangy flavor.
2. How do I get the cheesecake balls to hold their shape?
Chilling is key. After shaping the balls, make sure to freeze them for about 30 minutes before dipping in the melted chocolate. This step helps the cheesecake balls stay firm and prevents the chocolate from sliding off.
3. Can I make these cheesecake balls ahead of time?
Yes. These no-bake cheesecake balls are perfect for making in advance. Once they’re fully chilled and coated, store them in an airtight container in the fridge for up to a week. They’ll still taste just as fresh.
4. What other coatings can I use besides white chocolate?
If you’re looking for a fun twist, you can swap out the white chocolate for dark chocolate, milk chocolate, or even drizzle both for a dual-color effect. You could also roll the balls in crushed nuts or graham cracker crumbs for added texture.
5. Can I use a different type of fruit in the filling?
Definitely. While raspberries bring a beautiful balance of sweetness and tartness, you can experiment with other fruits like strawberries, blueberries, or even blackberries. Just be mindful of the fruit’s moisture content, and adjust accordingly.
6. How do I prevent the chocolate from hardening too quickly?
If your melted chocolate is setting too quickly, you can add a little coconut oil to help smooth it out and slow down the hardening process. This makes it easier to dip the cheesecake balls and get that glossy finish.
Feel free to experiment and make these cheesecake balls your own. Whether you’re swapping ingredients or trying a new coating, these little treats are as fun to make as they are to eat. Enjoy.
Recipe Card

White Chocolate Raspberry Cheesecake Balls
Ingredients
For the Cheesecake Filling:
- 8 oz cream cheese
- 1/4 cup powdered sugar
- 1 tsp vanilla extract
- 1/2 cup fresh raspberries
- 1/2 cup graham cracker crumbs
For the Coating:
- 12 oz white chocolate
- 1 tbsp coconut oil optional
- 1/4 cup freeze-dried raspberry crumbs optional
Instructions
- Prepare the cheesecake filling: In a mixing bowl, combine the softened cream cheese and powdered sugar. Use an electric mixer to beat them together until the mixture is smooth and creamy. Add in the vanilla extract and mashed raspberries, then continue mixing until everything is well incorporated. Finally, stir in the graham cracker crumbs to give the filling structure.
- Shape the cheesecake balls: Using your hands or a cookie scoop, take small portions of the filling and roll them into balls. Aim for about 1-inch size balls. Place them on a parchment-lined tray or plate. Once all the cheesecake balls are shaped, pop them into the freezer for about 30 minutes. Chilling them helps them hold their shape and makes dipping easier.
- Prepare the white chocolate coating: While the cheesecake balls are chilling, melt your white chocolate. You can do this in a microwave-safe bowl, heating in 20-30 second intervals and stirring in between to avoid burning. If you want a smoother coating, add a tablespoon of coconut oil to the chocolate and stir until fully melted and glossy.
- Dip the cheesecake balls: Once the cheesecake balls are firm and the chocolate is ready, it’s time to dip. Using a fork or toothpick, gently dip each cheesecake ball into the melted white chocolate, ensuring it’s fully coated. Let any excess chocolate drip off before placing them back on the parchment-lined tray.
- Chill the coated balls: After all the cheesecake balls are dipped, return them to the freezer for about 15 minutes or until the white chocolate has set.
- Optional garnish: For an extra burst of flavor and a pretty finish, sprinkle freeze-dried raspberry crumbs on top of the chocolate-coated balls before the chocolate hardens. This adds a pop of color and an extra raspberry zing.
Notes
- Calories: 130
- Fat: 8g
- Saturated Fat: 5g
- Carbohydrates: 14g
- Fiber: 1g
- Sugar: 12g
- Protein: 2g
- Cholesterol: 20mg
- Sodium: 35mg
Closing Notes
Congratulations. You’ve just made the most delightful white chocolate raspberry cheesecake balls, and now it’s time to enjoy them. Whether you’re treating yourself or sharing with friends and family, these little bites of heaven are sure to be a crowd-pleaser.
Remember, this recipe is incredibly versatile. Feel free to get creative with the flavors and toppings. You can swap the raspberries for your favorite fruit or try a different type of chocolate coating for a fresh twist. These cheesecake balls are perfect for every occasion, from casual snacking to special celebrations.
Enjoy the process, have fun experimenting, and don’t be afraid to make this recipe your own. Whether you’re serving them at a gathering, gifting them to a loved one, or indulging in a sweet treat on your own, these no-bake cheesecake balls will always hit the spot.
Thank you for following along, and happy baking.